User Guide
BP Doctor Smart Watch
Instruction Manual

Safety Warning
Please read this manual carefully and use the product according to the instructions to ensure safe and proper use.
Disclaimer
Before using this product, please read and thoroughly understand this statement. If you use this product, your behavior will be regarded as an endorsement of the entire content of this statement.
(1)Inactual use, there are differences or errors in the data due to individ- ual differences, usage methods and habits. Please refer to the actual usage.
(2)This product is not a medical device, and the health data provided is for reference only, not as a basis for diagnosis and treatment.
Product Introduction

Screen: 1.41 inch AMOLED touch screen, 320 X 360 resolution
Processor: 208 MHz MTK
Memory: 256M
Bluetooth: BLE4.2
Sensor: PPG heart rate sensor, Triaxial accelerometer, Gyroscope, Pres- sure
sensor
Battery: 170mAh Li battery
Charging: USB charging battery
Material: Medi-grade stainless steel
Language: Choose different languages
Size: 54x38x12.9mm
Weight: 80g
| Scenario | Testing Mode | Use time |
| 1 |
Blood pressure test mode:
|
2-3 Days |
| 2 |
Heavy use test mode:
|
2-3 Days |
| 3 |
Moderate use test mode:
|
3-4 Days |
| 4 |
Light use test mode:
|
4-6 Days |
| 5 |
Superpower saving test mode:
|
7 Days and more |

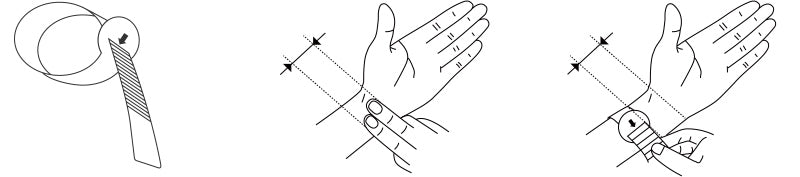
Measure your wrist with the diameter tape (keep two finger distance from the bottom of your palm when measure). Tighten the diameter tape. The smallest number indicates the most suitable buckle on the watch belt for blood pressure testing mode. For daily use, please loosen 1 or 2 holes until comfortable.

Long press and hold the power button for 3 seconds to turn on the device. Press the power button to activate the on/off screen.
Press and hold the power button for 2 seconds to turn off the device.
First Time Use
Scan the QR code below or download and install the free 'BpDoctor' from the app store on your smartphone.

Open APP to register and login with your phone number or email. First time registration requires gender/weight/DOB and etc. personal infor- mation.
Please fill in the correct information which may auect the test result.
Open the 'BPDoctor' APP on your phone. After registration and login, connect the watch and phone by bluetooth.
* Bind Bp Doctor: Search SN number on APP to connect.

● Tips
1.Unbind Bp Doctor: Login to APP, tap “Mine”, select “My Watch”, click “Unbind”.
(Data will be cleared and system will be reset after disconnection).
2.After the watch and the app are bound, it is a one-to-one pairing rela- tionship. If you want to change the pairing relationship (change the app account or YHE watch), you need to unbind the original watch and app.
Press the HOME button to enter the main menu.

After connecting, you will enter the main panel:
● From main panel, swipe left once for blood pressure test history. Tap to enter blood pressure test function panel.
● From main panel, swipe left twice for HR history. Tap to enter HR test function panel.
● From main panel, swipe left three times for blood oxygen history. Tap to enter blood oxygen test function panel.
● From main panel, swipe right once for sports step-count history. Tap to display distance, calorie burn, and steps.

Long press main panel for 3sec for multi-panel selection.

From main panel, swipe down for quick setting. You may set up bright- ness, Bluetooth, vibration, low-power mode, alarm, DND mode, and shortcuts here.

Connect the watch to the charging base as pictured below. Plug the charging cable into a 5V 1A AC adapter.
Do not use the watch while it is charging.

Blood Pressure Function
This blood pressure monitor uses the oscillometric method of blood pressure measurement. As the band inflates, the monitor senses the pressure pulsations of the artery beneath the band. These pulses are called oscillometric pulses. The electronic pressure sensor then displays the digital reading of the blood pressure on the display screen.
● This device is intended for use by adults and children over the age of 15 with adult supervision. The wristband is suitable for wrist widths of 135-215mm.
● This device can measure pressure from 0-299mmHg, and heart rates from 40-180 beats per minute (bpm).
1.Consult with your physician before using this monitor if you have had a mastectomy.
2.Consult with your physician before using this monitor if you have severe blood flow problems or blood disorders as cuff inflation can cause bruising.
3.DO NOT take blood pressure measurements more often than necessary because bruising, due to blood flow interference, may occur.
4.DO NOT disassemble or attempt to repair this monitor or other compo- nents. This may cause an inaccurate reading.
5.DO NOT use in a location where there is moisture or a risk of water splashing this monitor. This may damage the monitor.
6.The monitor, AC adapter and charging cable are not designed for use in water or wet environments.
7.DO NOT use this monitor in a moving vehicle such as in a car.
8.DO NOT drop or subject this monitor to strong shocks or vibrations.
9.DO NOT use this monitor with other medical electrical (ME) equipment simultaneously. This may result in incorrect operation of the monitor and/ or cause an inaccurate reading.
10.Avoid bathing, drinking alcohol or caueine, smoking, exercising and eating for at least 30 minutes before taking a blood pressure measure- ment.
11.Rest for at least 5 minutes before taking a blood pressure measure- ment.
12.Remove tight-fitting and thick clothing and any accessories from your wrist while taking a blood pressure measurement.
13.Remain still and DO NOT talk while taking a blood pressure measure- ment.
1.During the measurement, try to keep the measurement part at the same height as the heart. If the measurement part is lower than the heart, the blood pressure data may be higher; if it is higher than the heart, the blood pressure data may be lower.
2.The degree of wearing tightness will affect the blood pressure mea- surement. If the wearing is too loose, the measured blood pressure data may be higher; if the wearing is too tight, the measured blood pressure data may be lower. At the same time, if the wearing method is not stan- dardized during the measurement process, the watch will prompt an error and require the wearing method according to the standard specifi- cation;
3.During the measurement process, body movement, speech, and table shaking may cause inaccurate measurement. At the same time, the watch will prompt an error, asking to keep calm and relaxed.
Before taking a blood pressure measurement, please ensure you are relaxed and seated in a room with a comfortable temperature and a surface to rest your arm.
● Sitting Position
1.Sit in a comfortable chair with your back supported.
2.Elevate your arm to the same level as your heart.
3.Keep your upper arm next to your body.
4.Relax your wrist and hand. Do not move your wrist or clench your fist.
5.Keep your feet flat on the ground and do not cross your legs.

1.The position of the watch should be 2 fingers away from the palm (shown below).
2.Before measuring, tighten the band. For fastening instructions, please refer to the attached paper wrist tape. After measuring, loosen to the band to your usual level of tightness.
3.If testing more than once, please wait 2-3 minutes between each measurement.

There are two ways to take a measurement:
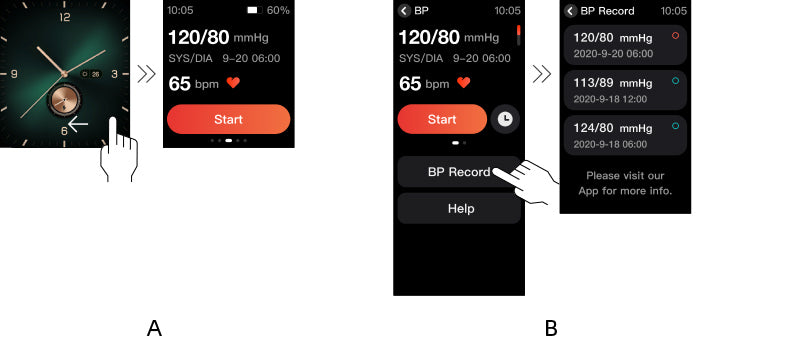
A.Press the home button and touch the blood pressure button on the screen to begin measuring.
B.Press and hold the HOME button to begin measuring.

There are two ways to stop a measurement:
A.During the measurement, click the stop button on the screen. Doing this will cause the device to stop inflating and release the remaining air.
B.During the measurement, press the HOME button.

Measurement results are stored after each measurement. Up to 30 mea- surements results can be stored at a time, and each new measure- ment will overwrite the oldest measurement.
There are two ways to check your measurement data:
A.Swipe left on the homepage to view previous measurements.
B.Press the HOME button to enter the main menu, tap 'BP Record' to review historical data.
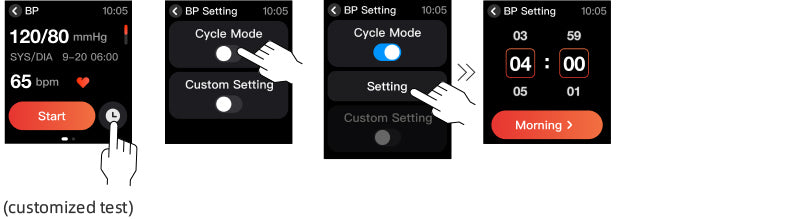
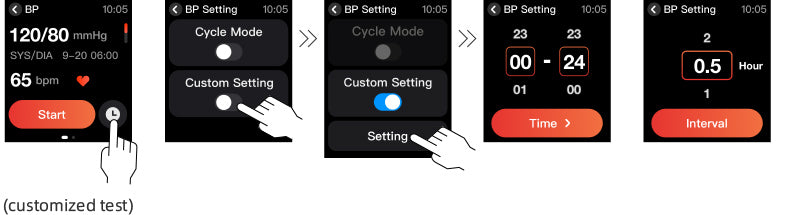
From main account, touch the customized test button to enter:
Mode One: Set up test time for morning, afternoon, and evening. Exit when finished, setting will be saved automatically.

Other Functions
1.The requirement of temperature:the measured body position should >30℃.
If the temperature is too low, it will lower blood circulation and decrease the accuracy of the measurement.
2.Relax your wrist and hand. Do not bend your wrist or clench your fist (see picture below).
3.Once the reading appears on the screen, keep the device stable for 30 seconds to allow the data to be stored.

note:
1.The position of the watch should be 2 fingers away from your palm.
2.Wristband should fit your wrist snugly.
3.Avoid tattoos and scars when wearing. Thick arm hair, tattoos, scars,
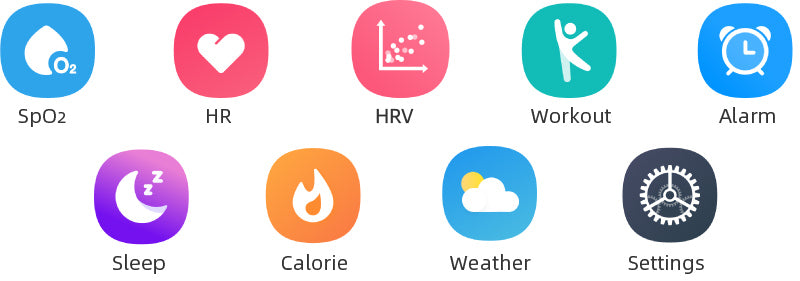
A.Click “HR” icon to start Heart Rate test. Wait 15sec for the result to display.
B.Swipe up to activate continuous Heart Rate test. BP Doctor will test your heart rate every 10 minutes.

Test HRV automatically at night and view result in the morning. Manually turn ou this function if needed.

Click “Workout” icon to select sport tracking modes. Options include:
Outdoor Walking, Outdoor Running, Indoor Running.

Tap the big icon to start testing, tap to set up test targets with Dis- tance/ Time/ Calorie.

In the Sports panel, swipe left to select pause, stop, or continue.

Set up alarms on your BP Doctor or on the APP.

This function will be activated by default.

View basic calories burn, sport calories burn, and walking calories burn.

Connect APP for weather forecast.

1.Display: Brightness, auto-lock screen, screen always on, Wrist-up Screen on (turn off “screen always on” and turn on “auto-lock screen”), Watch-face Theme.
2.About BP Doctor: General Information.
3.Language: Choose different languages.
4.Reset watch: Resetting will erase all your date.

Storage and Cleaning
● Store your device in a clean, safe location.
● Use a soft dry cloth or a soft damp cloth with mild soap to clean your device, and wipe dry with a dry cloth.
● Do not store your device in extreme temperatures, humidity, or direct sunlight.
● Do not expose your device to corrosive vapors or physical shock.
● Do not wash with water or submerge in water.

FAQ
Troubleshoot: Reading appears too high / too low / there is no reading. Solution: Change sitting position (refer to pages 8-10). Check if the hand and heart are at the same level. Check if the band is tight enough.
Avoid speaking while taking a measurement.
Troubleshoot: Each measurement is different, either too high or too low. Solution: Try to relax and take a deep breath, then retake the measure- ment. If the reading repeatedly shows an error, please stop using the device and reach out to our customer care. Do not open the device for self modification.
Troubleshoot: Will not power on, can not be charged or other unknown exceptions.
Solution: Long press the power button for 15 seconds to force the shut down. Then long press 3 the power button to reboot the device.
Limited Warranty
This Blood Pressure smart watch, excluding AC adapter and charging cable, is warranted to be free from defects in materials and workship appearing within 1 year from the date of purchase, when used in accor- dance with the instructions.
(Certain parts are consuming parts and periodic maintainace is recom- mended for the best user experience.)
For the maintenance not caused by the company's product quality, such as damage caused by improper use, improper storage, unauthorized dismantling and other reasons, the company will charge maintenance cost and the freight shall be borne by the user.